Thursday, December 15, 2016

Cantaloupe Scooter - Build

Cantaloupe Scooter is my first attempt to build an electric vehicle at MITERS.  The inspiration for the name comes from Charles Guan's Melon-Scooter, which was powered by a "melon" - a "6 kW" brushless outrunner that used to sell on HobbyKing.  Cantaloupe Scooter isn't powered by a melon, but does have a cantilevered rear wheel, a cantilevered belt tensioner, and a cantilevered motor and motor shaft.

The main reason I wanted to build an electric vehicle was to have a way to get to and from MITERS quickly.  I picked a scooter because it's easy to ride, fairly compact, and can double as a cart to carry heavy items from the loading dock.


Cantaloupe scooter was also built for almost no cost - I only purchased connectors and wire from eBay, which cost around $15.  The project was also done without the help of CAD - and as a result has some questionable design.  The front part of the scooter was built between the hours of 2 and 5 am, and as a result, isn't quite right.  Staying upright at full speed requires a lot of concentration.

Parts

The aluminum used for the sides and top of the frame came from Straight Razer and are almost unmodified.  There are a few bonus holes and slots I added to mount the front and rear assemblies.

The acrylic used for the bottom of the scooter is a leftover from some freshman maker class.

I got the HDPE blocks used in the front from the IDC scrap pile.  They look like they came from those weird white pedal powered things with a USB logo.

The front fork, handlebars, and wheels came from MITERS.

The belt is a leftover from Frozen Chainsaw Massacre, a powerwheels car that used electric chainsaw motors.

The twist throttle came from a convert-a-bike-to-electric kit found in the loading dock.

The aluminum billets used in the back came out of science equipment found at the loading dock and some plates found in the basement of building 5.

The pulley flange was made out of the lid from some biology equipment.

The bolts, spacers, and nuts came from MITERS.

Half the batteries came from some boxes of "dead" A123's found in the loading dock.  Roughly 30 of the 500 batteries were successfully revived. 

The other half of the batteries came from a trade - I traded 4 massive 40 Ah 3.3V LiFe batteries for 24 A123's that originally came from reuse.


The Battery

It all started when Alex and I found 500 A123's at the loading dock.  After carting them back to MITERS, we measured the voltage of every cell and ended up with this:

The cells to the left all have 1.9V or more, and the ones on the right have between 1.5 and 1.9V. First, the cells were all charged to 3.6V, and were allowed to sit for a week.  After, they were discharged on the Dyna-Load at 10 amps.

As they were discharging, the cell voltage was monitored by a microcontroller (our favorite stm32f446re), which streamed the voltage over serial at a relaxing 10 Hz to a laptop.  The laptop was running plotter, an application I wrote for the motor controller.  It plots the cell voltage in real time, and logs it to a CSV file, which can later be opened in MATLAB.  

A demo of plotter with some random signals, 200 Hz to laptop


The end result of this charge and discharge test was a big spreadsheet of cell data.  
These were my conclusions
  • These cells were thrown away 8 years ago because they were below their rated discharge voltage when they arrived new in box.  I picked them up at a cold loading dock.  All these cells appeared to recover perfectly.  There were four dead cells in the spreadsheet - these came out of a bag of mystery cells given to me.  To revive, simply charge at 0.5A until the cell gets to 3.3V, then go to 3A.
  • The last 10% of capacity goes away if the cell is charged fast.  On average, the recovered cells had 94% of their rated capacity when charged at 3A.  The 6 cells I slow charged at 0.5A got to between 98 and 100% of rated capacity.  
  • There appears to be no damage to the cells after 8 years of sitting in extreme discharge.  They have a comparable discharge curve to a brand new A123
  • It takes one or two cycles to "wake up" the extremely low voltage cells.  For the first two cycles, the cell voltage sagged to 3.4V or below when fully charged, though they still had comparable discharge curves under load.  After a few cycles, they sag to 3.5V after charging.
  • It's a total mystery as to why these cells showed up from the factory with low voltage.  There's nothing wrong with them that I can see.
  • 1.5V is the cutoff for reviving long-term discharged A123's.  I revived a set of 0.5V cells, but they had an order of magnitude more internal resistance than they should have.  Other than that, they seemed to work though.


In the end, I was short a few cells to put together a 12S3P pack, so I traded 4 very large 40 Ah LiFe cells for a few more bricks of A123s.  


In the first and second picture, I was playing around will different shapes of packs to see what fit best in the remains of Straight Razer.  In the end, I went with what's pictured in the second picture - two rows of 18 cells in a 6S3P configuration.  Each row could be charged and balanced by an ordinary 6S balance charger.

Each row of cells was put in massive heatshrink, which worked extremely well.

The Drive Assembly

For the drive motor, I used an 8fun brushless outrunner with sheared shaft that came from Dane.  This motor is usually used in ebike wheels, and is a great motor for vehicles.  Usually, this motor is part of a planetary gearbox, but I removed the gear and CNC'd a new adapter.  I was too lazy to CNC a pulley, so I 3D printed one instead.  It's a little smushed, but seems to work.
Motor with sheared shaft

The old gear

The new adapter


Adapter on motor

Adapter on pulley


To mount the motor, I machined two pieces of bar stock that came from an FSAE frame jig.  Unfortunately, the pieces had been "faced" to make them "flat", but they were around .05" off over 6", so all the mating sides needed to be remachined.
Clamping mount

Clamping mount with frame mount

Shiny Scotch-Brite Surface

Assembled motor mount and frame mount

Motor mounted to frame


Motor, frame, batteries, controller
Up next was the mount for the rear wheel.  I went with a cantilevered rear wheel because I couldn't find a 10mm bolt that was long enough.  The rear wheel mount is shaped like a cake so it can fit into the bore of the wheel.

The stock

The cake

Cake with holes

Cake with screws


I originally planned to make a cool looking block of aluminum on the CNC that connected the cake to the frame, but this was annoying to design ahead of time.  I put the frame of the scooter about 2 inches above the ground, and held everything in place with clamps, and came up with some plans for belt tensionsing and rear wheel mounting.
The block connects the frame to the cake, and has a slot for the bolts that serves as the axle for the tensioning pulley.


The slightly smushed pulley caused the belt to slip off, so I cut out this roughly circular pulley flange.  It turns out MITERS has nothing circular that's 4.5" in diameter to trace a circle with...


There slot for the tensioner is designed so the head of the bolt won't spin.


The cantilevered wheel looks weird

A delrin round thing was bored out and bearings were pressed in.

There's an additional piece of 1" x 1" bar stock used to join the cake to the plate

 The laser cut bottom plate fit on the first try!

No vehicle is complete without a name

The front of the scooter is a total disaster.  I took some huge chunks of HDPE, made them roughly the same size, then drilled a 1" hole at a roughly 5 degree angle.


The completed scooter has a a current top speed of around 18 mph, and a range of around 5 miles.  At high speeds, it's a challenge to keep everything stable due to the excessive steering friction.  I'm hoping the HDPE wears out over time.


Sunday, October 16, 2016

Electric Boat using a SEVCON espAC motor controller

It all started with a donation by Sevcon.  They gave some people at MIT some motor controllers, but they were difficult to turn on, and don't work with very many motors, so the controllers eventually trickled down to MITERS.  The controllers are 80V controllers, though they will drive motors from 44 to 116V. It is one of the most robust motor controllers I've ever seen - the battery inputs are protected against reverse battery connection, and the phase outputs are protected from phase to phase shorts at any time and phase to battery shorts at power on.  They're current limited to 600 amps for 1 minute, meaning you can get 48 kW at 80 volts, or 66 kW at 110 volts.  While this is a lot of power, it's at a relatively low 80 V.   Most motors (like the common hybrid car motors) like to be run at 400 V or so.  It's much more efficient to run at a higher voltage, and generally cars have enough cells and boost converter to get to a high voltage.  This might be why Sevcon had a few extra controllers. The controller also has 8 digital inputs, 12V and 5V rails, 2 analog inputs, 2 isolated potentiometer inputs (to avoid voltage drop from massive amps messing with your throttle), and 6 voltage controllable contactor outputs that can provide 6A peak, 3A continuous.  The whole case is rated for 2kV isolation, and is IP66 rated, meaning it's very water resistant.  It's been tested to 50 g shock, and 3 g vibration, 5 to 500 Hz.  I'm not familiar with any of their drop or EMC testing standards, but I'm assuming this controller is quite good.  It's designed for fork lifts, airport ground support vehicles/tow tractors, golf carts, scooters, and 'marine'.

There are a few drawbacks:
1). The controller is physically large.  It weighs 25 lbs and is 1 ft wide.
2). It is difficult to turn on.  More on this later.
3). There's no great way to interface with it - there's really only an analog input that has lots of filter and is difficult to adjust, so there's no way to update the torque setpoint very quickly.
4).  It requires a lot of things to be plugged in for the controller to work.
5).  It only can drive induction motors, no brushless permanent magnet motors
6). The controller needs to be tuned to each motor used with it, which is a difficult and involved process
7). It takes forever to set up.  Peter, Bayley, Dane, and I worked on this terrible thing for a whole week from 7 pm to 3 am each night to get it to an acceptable state.
8). The software has lots of weird bugs.  This is probably because ours says 'engineering prototype: do not operate' on the label.

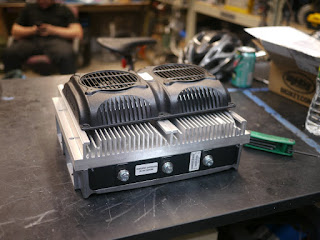
Dane took apart one of the controllers to see what was inside:

The heatsink is a nice aluminum extrusion that's connected to the board with all the FETs.  There are a TON of FETs in this device, each with their own BJT gate drive.  The FETs are relatively high resistance (19 mohms I believe).

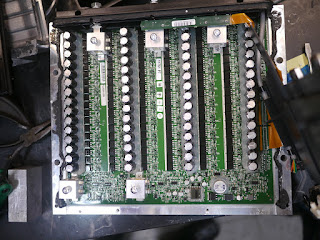
The logic board on this controller is equally impressive/bizarre:


Bayley, who enjoys searching the internet for interesting motors from cars, found the first car part for this project: a nice 'eAssist' induction motor from a Buick LaCrosse for around $100 that was roughly sized to work on this controller.  It claimed to be a 15kW motor, but it can do much more for a short period of time.  It's also nicely sealed and comes with a resolver and is water cooled.

We started by building a test load for the motor: a supercharger from a Buick ????.  

In the end, we were able to put around 10 kW into the supercharger.

Dane ordered a collection of connectors and pins to plug into the Sevcon.  Over the course of roughly a week, Peter, Dane, Bayley, and I managed to trick the controller into spinning the induction motor.

Debugging the controller was a massively annoying process that included:
  • Reading and writing x86 assembly
  • Programming a nucleo to scale down a high resolution encoder
  • Cross compiling code for STM32's on linux because mbed compiler website was down
  • Fiddling with linux usb interrupts
  • Hooking up a large water cooling loop from the MITERS sink to the electronics bench
  • and many other strange activities
We don't fully understand everything there is to understand about these controllers, but the some of the knowledge we gained in the process might be useful to others.  This next section is formatted more as a list of helpful information.  The debugging process is too boring to blog fully. 

POWERING ON THE CONTROLLER
The startup sequences is initialized by providing low current fused (5A I think) power to the logic board.  If it decides to enter the 'operational state', it will precharge the bus capacitors then turn on a contactor to provide power to the DC bus.  The controller will try to enter 'operational state' unless it was manually transitioned to 'preoperational (preop)' before being turned off.  If there is an error, the controller will go into preop automatically, but it will still attempt to go into operational the next time it is turned on.  Going into operational state when the controller is not properly configured can dump a huge amount of current into the motor without the motor spinning or applied throttle, so be prepared!  We used an 80V 25A power supply, which often current limited and browned out the controller during testing.  It doesn't take long for 2 kW to heat up even a large motor, so external cooling is recommended during testing.

It's very important that you don't use a 'smart' contactor that goes and lowers the coil voltage once powered on.  The sevcon contactor driver will go into an overcurrent state and prevent the controller from entering operational mode.  We also encountered a strange issue where our 80V power supply wasn't quite isolated properly and floated a few volts above ground, causing random overcurrent faults on the contactor.  Properly grounding the controller fixed this issue.  The sevcon also has adjustable settings for contactor voltage, as well as the ability to lower the contactor voltage after a few seconds if you don't want to burn out your contactor coils.
3 switches, contactor, and enable switch
You also need to provide an additional three switches - forward, seat switch, and throttle switch, to get the controller to drive the motor.  The I/O section of the configuration tool must be used to map these switches.

We also encountered strange behavior where we were able to read an analog channel, but the throttle position in 'driveline' wouldn't update.  I currently don't remember what the fix was, but I hope to update this section once I have a chance.

The sevcon connects to the computer through an IXAAT USB to CAN adapter and is programmed with DVT.  The DVT installer can be found on the internet if you look hard enough (it's a little tricky - the download link appears in an image of a PDF document) and can also be acquired from SEVCON customer support if you ask nicely.  Their engineering department is super awesome and gave us software called MOTOR-WIZARD, which installs firmware on a device to allow it to characterize a motor and generate configuration data for the specific motor.  Unfortunately, MOTOR-WIZARD goes and flashes some new firmware onto your motor controller that replaces the default firmware. We didn't have a copy of the original firmware for our controller, so installing MOTOR-WIZARD permanently turns the controller into a motor characterization device.  If you only have one controller, this will be a problem - you can't use a MOTOR-WIZARD flashed controller as a normal controller.  It might be that sevcon engineering will give out firmware to restore your controller, but you should definitely check before you flash your controller with DRIVE-WIZARD firmware. If you are interested in getting the configuration file we created with drive wizard or have questions,  leave a comment with your email address and I will send it to you.

 DVT comes in many different flavors - there's a generic customer version DVTC, several versions customized for specific customers with specific device support and customized window titles, and DVT engineering, which has the most settings.  It doesn't look like license codes are different between software versions, but your license code is tied to a single computer.  License codes can be obtained from sevcon technical support for a single computer in some cases, but are only valid for lower 'customer' access level.  The CAN packets are built/decoded in a single dll that also implements their licensing and 'access level' code, which can be fiddled with to make work if you are desperate, but it's much more pleasant dealing with helpful sevcon engineers than x86 assembly...    Even if you manage to "validate" your license (either with a license key or with some clever fiddling),  the license reading code in the dll needs to do additional checking to determine your access level.  Again, some amount of clever "fiddling" can adjust your access level to let you modify certain "advanced" settings, but again, dealing with Sevcon engineers is better than trying to outsmart the software.  The highest possible license is 5, which is the SEVCON engineering level.  This lets you change every setting of the controller, including ones that are stored in device configuration files (.dcf's) that might go and blow up your controller if they are incorrect.  We found that having access level 5 gives you very few new settings - I believe we only changed a level 5 setting once, which turned out to be not needed.

Unfortunately, the DVT GUI doesn't expose all the settings necessary to program the controller to work with a motor.  .dcf's are stored as plain text and contain lots of useful settings, though you will need to decode the hex values and scale by the appropriate amount and deal with endless 'param dyn range' errors.  This error means that you have entered some value in the .dcf that doesn't make sense or is out of range.  I highly recommend changing one setting at a time, power cycling, and checking for param dyn range errors to avoid having to remember the last 20 changes you made trying to figure out how you broke the incredibly fragile configuraiton data.  DRIVE-WIZARD will spit out a .tcl script that can be loaded with "File->Source" to go and change the settings to work with the motor.  This is the best way that we found to configure the Sevcon.

The workbench
We also needed to provide encoder position feedback to the controller.  It needs to be a quadrature signal that's not too fast.
Peter's soda can/hot glue coupling worked great!

Unfortunately, this encoder was high resolution and generated quadrature signals in the 100's of kHz range, which was too fast for the slow TI brand DSP on the Sevcon logic board.  Using some of the encoder code created by Ben, we tricked an STM32 nucleo board into becoming an encoder divider.  My implementation of the encoder-divider is available here: LINK

The nucleo's 3.3V outputs weren't enough to drive the Sevcon inputs, so we added some transistors

The board is taped to the table so it doesn't fall off.
Amazingly, all this nonsense worked, and the motor spun up.  Here it's spinning at around 2000 rpm, out of a maximum of around 8000.
At full speed it sounds like this: 


which is absolutely terrifying.  We had to hook up water cooling from the sink to keep the motor at a comfortable temperature. 

The next stage of the project was completed extremely quickly and with few pictures taken, so documentation is brief.  The "outboard" uses an alternator belt from a Kia that runs in the water to drive the propeller.  This actually worked, but only with extreme tension on the belt.  Dane performed a small miracle, and somehow determined the spline on the propeller was the same as the spline on a Fiat 500 steering wheel, so we used steering parts from a Fiat as the propeller shaft.  Rob Reeve created a beautiful copper coil for the cooling loop, which was driven by the amazing brushless Toyota Prius water pump.  

Peter and I mounted the sevcon and created some more legitimate wiring:


Sevcon in boat

Box of Switches
battery
Motor on boat
4 of these packs should be enough...
Loaded boat

The boat worked moderately well.  Unfortunately, our pulley ratio was off by a factor of two.  Our motor could only spin at a very low speed, in a range where it can give us only around 9 kW, instead of the 30 we designed for.  The boat did not plane, which also might have been because it was a small aluminum fishing boat, not a speedboat.   We were unable to increase the motor velocity because the controller was operating at the 600 amp phase current limit.  At this low speed, we were only at around 20% DC bus utilization, but we could not safely put any more volts across our motor.  The mechanical disadvantage from the incorrect pulley ratio would have caused the phase current to exceed the limit.   At full speed we could only put 9.6 kW into the motor, which was enough to get to 8 mph.

See a video of the boat in action here:
https://vimeo.com/182904726
questionable underwater alternator belt.